|
I
used photo etch seatbelts. Look pretty nice right? Come on say they look pretty
good before you read the next sentence. They’re ME262 belts (German aircraft
for those of you that may not know that). Now I know there are a few of you
reeling and squirming in your chairs right now. Come on… looks good and
used up some parts I had lying around. Who will really notice among all the
non-pro’s? No one.
Now
place the cockpit into the fuselage to check out the fit. Don’t forget to
spray inside the fuselage with the Chromate yellow. The test fit will tell you
what things need to be trimmed or filled in order for the cockpit to fit snugly
in position before gluing the half’s together.
Using
my “Touch & Flow” applicator (get one), I run around the seams with
Tenex, using mostly masking tape to hold the half’s together. This one of
those times you want to put the piece down and let it dry over night. If you use
Tenex, be careful with it. It is very active and melts the plastic without mercy
if you use too much. You also want to keep your fingers far away from it and
Tamiya Thin. If your finger is anywhere near where the glue is wicking its way
to, then it will wick right around your fingerprints and leave a perfect copy on
the model. This will require you to sand your prints off the kit. Just another
step and frustration you don’t need.
See
photos 03, 04 and 05
Click on
images below to see larger images
|

|
|

|
|

|
|

|
|
Photo
03 |
|
Photo 04 |
|
Photo 05 |
|
Photo 06 |
When
dry, clean up the seams with a series of sanding sticks ending with a buffing
stick. The picture shows just how invisible seams become with this method. The
processes is remarkably quick, it really only took me a half hour to 45 minutes
to get most of it finished. Since I didn’t use quite enough pressure when
squeezing the pieces together the seams require a little filler. No problem,
just mask off the area with some tape first (this minimizes the amount of clean
up needed). Using a flat toothpick, I spread filler over the area. I pull the
tape off as soon as I’ve finished applying the filler. If you wait until
it’s dry to pull off the tape you’ll pull some of the filler out. After
sanding the filler, I re-scribed the lines using a sharp pointy object because
dull blunt objects don’t scribe nice lines. There’s no secret to scribing
really just make several light passes in order to get the result you desire. I
sometimes brush Tamiya Extra Thin along the line I just scribed. This can smooth
out and clean up the line. Experiment with that before you try it on a kit! What
you have to remember is this, if you don’t get a seam right it will show no
matter how minor the flaw. So if you don’t want it to show…fill, sand,
buff… makes it invisible. It’s easier to do it all now than it is after
you’ve painted the damn thing.
See
photos 06, 07, 08 and 09
Since
I’m using kitchen foil on this kit, there is a requirement for special glue.
I’m not a fan of Microscale’s product for this application. There is better
glue at 1/10th
the price. You’re going to notice some lines in the foil after I place it on
the kit. I’m using this build as an opportunity to experiment with the glue on
the back of the foil, to get a sort of texture to the metal. It’s a long story
so just ignore any lines in the panels you may notice in the photos. (By the
way, the experiment was a failure).
See
full size photo above and photo 10 further below
After
foiling the fuselage and wings, I test fit them along with the cowl.
See
photos 11, 12 and 13
Moving
on to the flaps… there’s not much excitement in gluing flaps together so
I’m going to use this time to show what I look for when gluing stuff together.
The photo shows the two things you should look for,
-
(a)
Shows what not enough glue looks like, whereas
-
(b)
Shows the fine beading of melted plastic that brings me the warm fuzzy glow I
seek.
See
photos 14 and 15
When
you have something that looks like (a) in photo 15 then there’s a good chance that when
you try to clean up the piece, you end up with a ridge-line where the two pieces
connect. You have to re-glue or fill the piece to correct the problem. (b)
in photo 15 Shows
a great and complete seal. This will clean up very easily and leave you with a
nice finish not requiring any filler. Photo 16 shows what happens when you
squeeze (a) together, the piece separates. Correct this before you move on.
See
photos 16, 17, 18 and 19
The
mark at the end of flap is a compression wound showing the result of sloppy
removal of a piece from its sprue. This needs to be fixed too. This requires a
little filler and an applicator. Really anything is an applicator but I use
either a flat toothpick (not the round ones), or a spatula. This is a fast fix
so don’t fret it. Apply, dry, sand, buff, done. Check out how they look in
position because test fitting will tell you if everything is within the
tolerances acceptable to you.
Now
a little bit about washes. Since enamels are my first choice for painting, this
limits the methods I can use for washes.
See
photos 20, 21 and 22
I
have a porcelain mixing tray which I like much better than the plastic ones.
First it stays in place while you’re mixing due to its weight and second, it
doesn’t stain and otherwise cleans up a lot easier when you leave paint in it
for a couple of days. Now I know you’re going to say “but I’ll never leave
any paint in it, I’ll always clean it out when I’m done”. Ok, you stick
with that and call me in a year or so. I use several methods for washes;
(1)
The Detailer stuff you saw earlier in this article. The great thing about this
is that it cleans right off with a little water without leaving any trace. If
you don’t want to clear coat or put on several Future coats before you start
to weather then this is the stuff to use. It comes in several colours so you can
mix it up for different applications. Maybe you want to dab some on for fuel
staining (red-ish), oil leaks (yellow-ish brown-ish) etc, etc.
(2)
My favorite really, scraping off pastel chalk dust into a small jar, adding some
water and a drop of dish washing liquid. I like this method because it is easy
to clean off when you screw up and allows for endless colour combinations. If
you use this to weather on flat paint without a clear coat, it can stain it but
it’s usually still workable. See ARC Tool & Tips.
(3)
What you see in the photo 21 is oil based paint, thinned.
See
photos 23 and 24
If
you’re just starting out and you’re painting with enamels, then I would
suggest you not use this method. It can frustrate you due to fact you’re
wiping off the excess with the same thinner that will remove your enamel paint
job. It may result in repair work you’re not prepared to handle. There are
other ways and means to accomplish your goal (straight powder like the MIG
powder or water colours), you can look up some of the weathering and wash
articles in the Tools & Tips section on ARC and they are simple to use and
shouldn’t cause you any grief.
Here
are the wings, flaps, cowl, inner and tail wheel doors, attached to Jug. When
you set the inner doors in place, now is the time to fit the hydraulic rams in
place while you can still move the doors around a little.
See
photos 25, 26 and 27
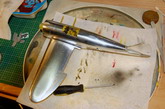
Landing
gears always have that seam running down them. I use the knife in the picture to
scrap it off, then the buffing stick.
See
photos 28, 29 and 30
I
need to back up a bit on assembly because I forgot to mention something… when
assembling the stabilizer and elevators make sure they are square, at right
angles to each other and run on a perceived level plane with the wings. Since
I’ve been jumping around on this build and worrying about taking photos, I
forgot to check this during the assembly. It’s actually out on this build but
I have to leave it at this stage. It’s a rookie mistake and something that if
put your build in a contest, will cost you big time. Don’t you forget to do
this; it is one of the more noticeable things about a build when it’s wrong.
Even if you just build for fun, pay some attention to this detail.
See
photo 31
The
wheels got glued together, clamped, and left overnight. Starting with the tail
wheel, I sand off the seam and then flat spotted the wheel for that “It’s
got weight on it look”. Before sanding the flat spot on the main wheels, I
like to put a lot of wear on them. This is accomplished with the trusty old
Dremel. Hold the wheel in your fingers lightly, and let it spin on the sanding
wheel. Added a little wash to gear as well. You can also heat up the wheels
and press the against the table
to create the “weighted”
look. This is a little tricky and can get away from you pretty quick, so I’d
leave trying that method for another time.
See
photos 32, 33, 34 and 35
When
you paint your wheels, don’t use black. Use dark grey at best, it looks
better.
See
photos 36, 37, 38 and 39
Continuing
with the landing gear, I brushed on some black pastel dust I scraped off a
pastel stick and keep in the plastic tray photographed here.
See
photos 40 and 41
Non-slip
Wing!
I
know this is a little out of order but keeping track of my photo’s and the
timeline has been a nightmare, so I’m placing this little section in here so I
don’t have to re-arrange everything else I’ve done! I’m not certain this
feature even belongs on this aircraft but that’s the beauty of this hobby
isn’t it?! Instead of using the decal provided in most kits for the anti-slip
coating on the wing, I paint the feature on with a bit of a twist. I start by
masking off the area with some tape then spray on glue!
See
photos 42, 43, 44 and 45
Photo
43 is the glue used for the non-slip wing walk. There are several ways to get the
texture look and feel but I like this process. With the area masked off, spray
the glue with one smooth, quick motion. The spray glue gives a very cool texture
you can’t get with the decal or paint alone. Leave the masking in place (I
removed it in the picture to show the glue). Let the glue dry for a couple of
days though before you spray black or more preferably, dark grey over top of the
glue or you might see some cracking through the paint. I’ve also used emery
cloth glued on a wing for this effect, it wasn’t bad.
Larry Shred
Click on
images below to see larger images
|
Photo 7 |
|
Photo 8 |
|
Photo 9 |
|
Photo 10 |
|
. |
|
. |
|
. |
|
. |
|
|
|

|
|

|
|

|
|
Photo 11 |
|
Photo
12 |
|
Photo
13 |
|
Photo
14 |
|
. |
|
. |
|
. |
|
. |
|

|
|

|
|

|
|

|
|
Photo 15 |
|
Photo
16 |
|
Photo
17 |
|
Photo
18 |
|
. |
|
. |
|
. |
|
. |
|

|
|

|
|

|
|

|
|
Photo 19 |
|
Photo
20 |
|
Photo
21 |
|
Photo
22 |
|
. |
|
. |
|
. |
|
. |
|

|
|

|
|

|
|

|
|
Photo 23 |
|
Photo
24 |
|
Photo
25 |
|
Photo
26 |
|
. |
|
. |
|
. |
|
. |
|

|
|

|
|

|
|

|
|
Photo 27 |
|
Photo 28 |
|
Photo 29 |
|
Photo 30 |
|
. |
|
. |
|
. |
|
. |
|

|
|

|
|

|
|

|
|
Photo 31 |
|
Photo
32 |
|
Photo
33 |
|
Photo
34 |
|
. |
|
. |
|
. |
|
. |
|

|
|

|
|

|
|

|
|
Photo 35 |
|
Photo
36 |
|
Photo
37 |
|
Photo
38 |
|
. |
|
. |
|
. |
|
. |
|

|
|

|
|

|
|

|
|
Photo 39 |
|
Photo
40 |
|
Photo
41 |
|
Photo
42 |
|
. |
|
. |
|
. |
|
. |
|

|
|

|
|

|
|
Photo
43 |
|
Photo
44 |
|
Photo
45 |
|


