|
Hello readers
and fellow modelers!
Here I am
with another article about an old Airfix kit. This time the subject is a 1/72
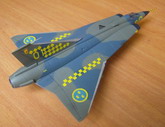
Saab J-35 Draken from the Swedish air force, in fact the third of the kind
I’ve built. The Airfix Draken kit was from their Series
2, with much more external (raised) detail than that of Series
1 kits, but still with a basic “pilot + seat” cockpit and featureless
well bays, among other features common to Airfix kits. This third Draken differs
from the previous two in that it has the later F-type canopy, while the other
two had the B type canopy. Nevertheless, all the Airfix Drakens had the small B
type nose cone and cannons in the port and starboard sides. It seems that Airfix
updated the canopy for a J-
35F
but failed to update the nose cone and the cannons (the J-
35F
had just one cannon.)
The build was
OOB and almost straightforward. However, the fit of the upper and lower fuselage
halves was very poor at the cockpit section, and after so much scraping and
sanding the fuselage lost part of its round shape there. Another problem was
that the nose cone had a very deep sink that had to be filled and sanded in
three sessions to get the original shape. As always, I left the external stores
and the undercarriage assemblies for the final stage, but I glued the underwing
pylons before painting.
Click on
images below to see larger images
Painting the
Draken was always an elusive task for me. In the two kits I built as a teenager
I was satisfied following the kit’s instructions (which indicate mixing colors
from the Airfix range without giving mixing ratios) because I didn’t have
photographs of the real thing. However, for the third built I could make a
research of the colors at the Internet, so I started looking for color
photographs of Swedish Drakens. Some of the photos show a light blue-grey for
the undersides plus a brownish green and dark blue-grey for the upper
camouflage.
Before painting I polished the belly section that would be painted
in NMF, then I masked that section and the canopy glasses. Later I painted the undersurfaces
with a 1:1 mix of FS36375 Light ghost gray and RLM65 Light blue to match the light
blue-gray. Then I draw and cut, with the aid of a french curves template,
symmetrical masks for the port and starboard upper to lower color separation
lines at the front fuselage area, and applied these masks carefully before painting
the camouflage. I
first tried
to get the brownish green by mixing FS34087 Olive Drab with Khaki, but looking
other photos I found that a lightened FS34087 Olive Drab was better and I
painted my kit's upper surfaces with this color. Then I made paper "soft
masks" for the camouflage and later I painted it using a 3:1 mixture of
FS35042 Dark sea blue and FS36118 Gunship gray, but the contrast
between the camouflage colors just didn’t look right to me.
Further
research on the Draken camouflage lead me to a review of a Zotz Decals’ sheet depicting
a Swedish Draken with a red fin and a white ghost over it. The painting diagram
of these decals indicates FS34086 Dark Olive Green (MM Green Drab) and FS35042
Dark blue for the camouflage, so I masked the previously painted dark blue-gray
patches and then painted the green patches again with a 6:1 mix of FS34086 and
white. It was hard to follow the original contours, so the resulting color
separation line was harder than I wanted in some places.
The Zotz
decals painting diagram also indicates FS36173 Blue-gray for the undersurfaces,
but I think this color is too dark and doesn’t match the color of the
photographs, so I didn't paint the undersurfaces again. Incidentally, I later
found a newer Draken decals review, this time from a Two-Bobs sheet which
indicates FS35237 Medium gray for the underside color, this one is very close
to the one that I mixed. The Two-Bobs sheet however indicates FS34064 for the
green, which is an almost black green. Another Internet reference even suggests
using Hu123 Extra dark sea grey for the dark blue-grey. It’s then hard to decide what to do when one finds contradictory references!
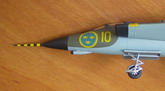
After the
camouflage painting was done, I realised that the nose probe of the kit was too
long, but I couldn’t take the nose cone of the photographs as a reference for
measurements because the kit’s cone was too short. As I wanted to paint the
nine black and yellow stripes on the nose probe that is shown in the decals’
painting diagrams, I cut the nose probe at
18 mm
to make the masking of the stripes easier. After cutting the nose probe, I
painted it yellow (Hu 69) and then masked four
2 mm
stripes separated by
2 mm
spacings. Later I masked around the nose, around the jet intakes and around the
leading edge of the upper fuselage blade antenna, then I painted these and the
nose probe with my "scale" flat black mixture. When I took out the
masks I had 9 equal-width stripes on the nose probe. The probe still is a little
longer than it should be, but the stripes look very nice!
When all the
basic painting was done, I accented the control surfaces’ panel lines with a
sepia ink wash, then airbrushed two coats of clear acrylic to the airframe and
it was time to struggle with the more-than-30-year-old kit's decals. The decal
film was obviously yellow, so I taped the decal sheet inside a window and let
the sunlight bleach it for a week or so, but the yellow didn't disappear
completely.
I had a
previous bad experience with cracking decals after the sunlight treatment, so I
applied a generous coat of Micro Liquid Decal solution to prevent it. Yes, it
prevented cracking, but the decals became so stiff that they didn't want to
conform to the model's surface even after the application of Micro Set and Micro
Sol. I even tried Solvaset, but it just turn things worse as it made decals to
wrinkle but still they didn't adhere to the surface. I solved the wrinkling
problem by literally washing the decals with Micro Set to remove the Solvaset.
I had to
apply thinned white glue in order to attach the decals to the model's surface,
but when it was dry the decals silvered in many places, and lifted at the edges.
I then carefully cut the lifted edges and hid the silvering by painting the
background colors with a fine brush over the clear film of the decals. All in
all, the decals application was a nightmare, but I could manage it. My old
decals almost ruined the kit, now I understand why many modelers buy aftermarket
decals.
When decaling
was finished I applied a coat of acrylic flat and took out the masks from the
belly. Now it was time for painting the NMF there, at the leading edge of the
wings and the tail, at the wheel wells and the inner side of the undercarriage doors,
and at the under-belly drop tanks and their pylons. I masked carefully to avoid
tape touching the decals, the hardest part was masking the wings' undersurfaces
due to the presence of three fences under each wing. For NMF variation, I
painted the wheel wells and the undercarriage doors' inner side with Hu 56 Aluminum,
and the remainder with Humbrol Metal Cote Polished Aluminum. For further NMF variation
I used Tamiya Flat Aluminum and MM Chrome Silver on the undercarriage legs and
wheel hubs, and Humbrol Metal Cote Gunmetal on the exhaust cylinder.
At a certain
point of the build I painted the two AIM-4 Falcon missiles with a mix of
Humbrol 2 and 38 gloss greens, and then applied a clear satin coat to them. To finish
the kit, I assembled and glued the undercarriage, glued the external stores, painted
the navigation lights and the IR sensor, applied some dirt and gun-smoke stains
with powdered pastels, removed the canopy masks and polished the canopy glasses
with Model Wax. Unfortunately, the cotton swabs I with which I polished the wax
scratched some of the paint next to the canopy, so I had to mask and retouch the
paint before I could finally said that the model was finished.
Well, after
working much more than I had planned in the beginning, I am quite glad with my
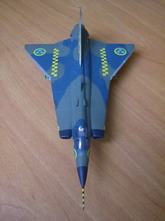
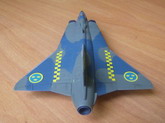
Draken, it looks nice with its unique and revolutionary double-delta design,
and its yellow checker markings, among other jets designed in the 50’s. I
learned that searching for references is very important, but in the end the
naked eyes and the personal tastes are what count in the final decisions. I hope
that you, dear reader, could learn something from my experience and from my
mistakes.
Thanks for
reading and watching. Greetings from Caracas, Venezuela.
Orlando Sucre Rosales
Click on
images below to see larger images
|
|