|
History:
Since
there are many Tomcat fans that visit this site daily, there is not much I can
add here. Maybe the story of how this project came to be is more appropriate. It
all started with an impulse buy at a hobby shop in Truro, Nova Scotia. After
scanning the 1/48 scale shelves a second time, the Italeri F-14 B Super Tomcat
kit kind of jumped out at me, is that a symptom of AMS? I didn't know much about
this boxing, but since I had never been disappointed by Italeri before, I showed
it to SWMBO and she nodded approvingly. So I brought it to the cash along with a
few supplies, made my purchase, and started on the long road home and to ARC so I
could start researching my next project. Along the way, I decided I would model
a Tomcat that is in OEF.
I
soon discovered that there are some major inaccuracies in this kit, notably the
exhaust nozzles and a few other areas I discovered along the way too. It was
suggested I use some parts from the Italeri kit to backdate the Revell F-14D
kit. So off I went in search of the Revell kit, found it at WalMart. Now it was
time to start building.
The
Kits:
The
Italeri F-14B kit looks impressive until you look a little closer. The exhaust
nozzles are the biggest flaw, they are not even close to the right shape, they
are cone shaped and have 14 petals each. The surface has a sandy texture and the
landing gear legs are a bit soft in detail. The kit does have some merits
though. Engraved panel lines throughout. The canopy has what I thought to be a
mold separation line, but after looking at a
few walkaround pics, I
figured that these lines belong on the Tomcat canopy, some type of antenna
perhaps? 4 AIM-54's, 2 AIM-7's and 2 AIM-9 are included as are a pair of
external fuel tanks and a TARPS pod are also included, but no LANTIRN. 2 types
of chin pods do come with it. Decal options are for VF-74 Bedevilers and VF-154
Black Nights. Oddly, VF-154 has never flown the "B" Cat. Both of these
feature the TPS camo.
The
Revell F-14D is a much better kit for modelers on a budget. Despite it's raised
panel lines, it is much more accurate than Italeri's. First of all, the correct
exhaust nozzles are included. Also, it feature the correct gun gas vents. The
landing gear is very nicely done, the nicest I have seen till I got my hands on
the Hasegawa F/A-18. The boarding ladder can be posed open with a little surgery
to the lower fuselage half. The cockpit is sharply moulded but feature the
F-14A/B
RIO panel instead of the newer F-14D type. 2 more chin pods come with this kit
(between the 2 kits I have all 4 types of chin pods). The external stores
include 2 each of AIM-54, AIM-7 and AIM-9. No tanks, TARPS or LANTIRN. My kit
had a few manufacturing flaws, the fuselage halves and one wing were badly
warped and my canopy was short molded.
Decal
options on this one are a TPS VF-31 Tomcatters and a TPS VF-124 Gunfighters.
Construction:
My
original plan was to backdate the Revell kit using some parts from the Italeri
kit, namely the GRU-7 seats and the single lens chin pod. I would also have to
use the Italeri canopy, I liked it better anyways. I started with the cockpit
and seats, I added the ejection ropes using thin copper wire painted
accordingly. This was my best cockpit yet, wish I had taken some pics at this
stage. There was enough raised detail to drybrush, looked quite convincing. I
then moved on to the wings, which needed a bit of work to straighten out,
nothing serious though. After these were painted and decaled I set them aside so
I could start the main fuselage...
"Voodoo
One, Voodoo One...Wood's been hit, Wood's been hit..."
Here's
where I got into trouble. I tried for two days to straigten out the fuselage
halves, I thought I had them straight enough. It was time to dry fit the parts
with the cockpit tub and wings in place. There were more steps on the seam lines
than an Aztec pyramid. I quickly decided this was beyond my abilities to
correct. Time for plan B... I would have to use the Italeri fuselage. The Revell
cockpit wouldn't mate to Italeri's fuselage without a bit of work, possible but
I decided to take the easy route and use the Italeri tub instead. No problem, I
used the same technique on it as before. I gently pried the GRU-7 seats from the
first cockpit and glued them in place.
| Next
came the tough part. Out came my Craftsman rotary tool and cutting discs. I cut
into the Revell parts first to extract the heat shielding. I left about
1/8" on all the cuts, I could file them down afterwards, this gave me a
good margin of error. Next the plating at the rear of the Italeri fuselage was
trimmed down in a similar manner. I then glued the upper and lower halves
together at the rear, reinforced with a few lengths of sprue. The pivot points
on the completed Revell wings would have to be drilled out to fit the bigger
pins on the Italeri kit. I then installed the wings and glued the forward seams
of the main fuselage. Lots of filler was needed to fair in the new heat shields,
Elmer's Plastic Wood was used for this. Then much sanding was done. I hand
painted the area to see how it looked, the only visible flaws were down below,
nothing to worry about, this Tomcat is staying in port and not headed to any
modeling contests.
|
| Click
on image below to see larger image |
 |
|
From
that point, I mainly stuck to Italeri's kit instructions. Along with the wings,
exhaust and heat shields, these are also from the Revell kit: 1 AIM-7, 2
AIM-9's, wing glove pylons and sidewinder rails, front landing gear, and the
rear inner canopy frame. I modified the starboard glove pylon to accept a
LANTIRN pod from the Hasegawa weapons set D. Also from the smart bombs set came
the 2 GBU-10's. Still needed bombracks, along came James Clark to the rescue who
donated a few resin facsimilies. The Italeri TARPS pod was not used.
Paint
and Decals:
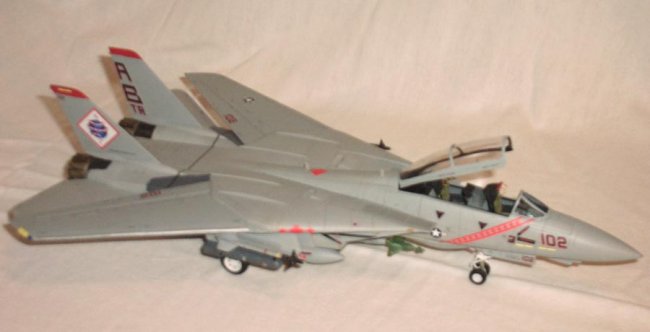
I
got a hold of CAM decals excellent sheet (#48.098) with markings for VF-143
Pukin' Dogs in a TPS scheme and VF-102 Diaomondbacks in an overall light ghost
grey, with Hi Vis markings, this aircraft was involved in OEF, I chose the
VF-102 scheme. Model Master Acrylic FS-36375 Lt Ghost Grey was used overall.
Other colors used are gloss white, aluminium and steel. The exhaust petals were
first painted with Testors steel enamel, then overcoated with Tamiya smoke.
Inside, the nozzles are a flat black base with white drybrushing and pastels.
The heat shields were hand painted using Model Master graphite metallic. A trick
I picked up here worked very well, to make the red edges on the gear doors, I
used a red Sharpie permanent ink marker. The decals were in near perfect
register, and had little carrier film. The settled down very well with
Microscale's Microset. Also featured on the sheet were bomb graffiti, with
IloveNY, FDNY, From Texas, The Big Stick and Hijack This. These were all used on
my LGB's.
|
Click on images below to
see larger images |

|

|
|
Conclusions:
This
was a much more difficult build than I had first anticipated. It's not perfect,
I found a few errors after I finished. Still I am happy with the result as it
sits on the highest shelf of my book case. It surely would not have been
completed without the support and encouragement of the ARC regulars. I will save
the Pukin' Dogs decals for a Hasegawa kit sometime in the not too distant
future. Thanks to all who helped me out here and to Steve B for giving us this
great forum.
|
| Click
on image below to see larger image |
 |
|
|
|