| No history lesson needed here as to the inspiration behind the building
of this model, as most of us still have fresh memories of the smoldering towers
that was once the World Trade Center, a burning Pentagon building, and the crash
site of Flight 93 in rural Pennsylvania.
After seeing that Two Bobs Aviation Graphics planned to issue a decal
sheet for aircraft engaged in Operation Enduring Freedom, I waited with bated
breath until their release.
In the meantime, I gathered my reference materials and picked up
Revell’s 1/48th F-15E Strike Eagle kit.
After receiving the decals in the mail (three days from California to
Michigan-not bad!!), I went right to work.
|
| Click
on image below to see larger image |

|
|
First
order of business was to remove the stabilizers, remove the access panel for the
20mm cannon, and make the necessary modifications to drop the outer flaps.
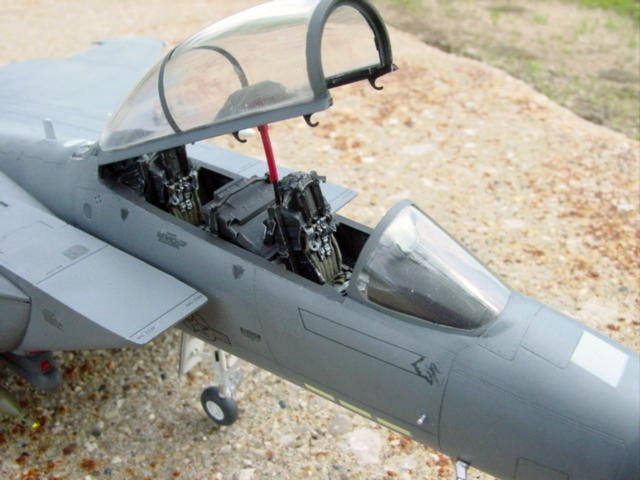
Next I went about building the cockpit and front wheel well.
I added the ejection seats from a Black Box F-16 cockpit set (I screwed
up the cockpit tubs trying install them in a Hasegawa F-16 L)
and dressed them up with photo-etched pieces from a Verlinden detail set.
Other than the seats, the rest of the cockpit was built box stock.
|
Click on images below to
see larger images |

|

|
After I added the cockpit/front landing gear assembly, I glued the
forward fuselage together and eliminated the seam.
I added a resin 20mm cannon and access door from a Verlinden F-15E detail
set.
The cannon was fitted to the upper fuselage after much grinding, swearing
and filing. The intakes were built and added to the bottom fuselage half.
The fuselage halves were glued together, the seams filled and polished
out, and the wings were added.
Part of my plan involved pinning the stabilizers so they could be
repositioned at will.
Holes were drilled into fuselage and styrene sleeves added for the
stabilizers.
Next the stabilizers were shimmed to replace plastic lost during the
removal process.
After adding brass rods to the stabilizers, they were inserted into the
sleeves to make sure the fit was snug.
Trial and error found that the plastic sleeves wore out after moving the
stabilizers a few times, so I removed the styrene sleeves and added sleeves made
from aluminum tubing.
Super glue was added to the brass rods and reinserted into the fuselage.
To keep the glue from setting the stabilizers in one position, they were
slowly rotated until the glue set up.
The stabilizers now have a tight fit and can be repositioned.
To simulate the green tint given off by the HUD, I used a mixture of
Future Floor Wax and a green pearl powder.
This was brushed onto the HUD and left to dry.
When the HUD was ready, it was glued to the instrument shroud and the
front wind screen added and resulting seam polished out.
| Now
comes my favorite part of any project (except cars!),
the painting and decaling process.
The vertical stabilizers were temporally added before painting began.
For the base coat, the model was sprayed with Model Master FS 36118
Gunship Grey. After the base coat had dried, the radome was masked off and
Gunship Gray with about 25% white added was applied in thin coats. |
| This was sprayed in between panel lines and on the upper surfaces.
All bomb pylons, the CFT scoops, the canopy framing, and the fuel tanks
were painted at this time as well.
I used Testors metalizers for the lower aft fuselage and areas around the
engines.
When the paint had dried, the model and all the add-ons were given a few
coats of Future Floor Wax in preparation for decaling and weathering.
I used a wash of Gunship Gray to accent the panel lines and a black wash
for the vents and various grills.
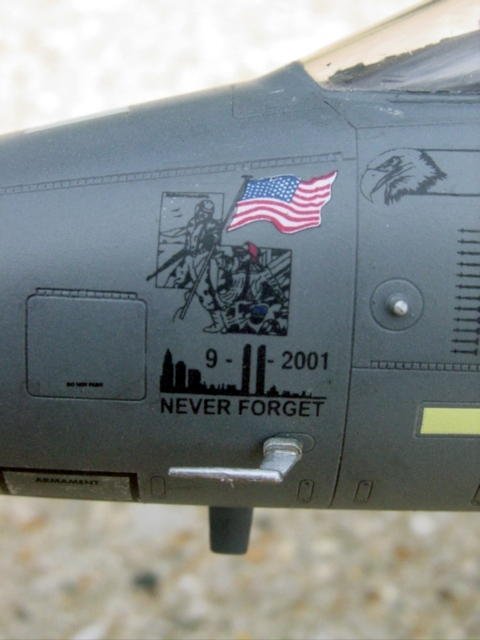
Two Bobs provide five different nose art designs with matching serial
numbers, and enough stenciling to complete two OEF F-15Es.
Also included is an update insert with the tiger stripe fin flash, eagles
for the inside of the vertical stabilizers, and TAC badges.
I chose a/c 89-506, with the Fireman handing a soldier an American flag.
Although it is indiscernible on the decals sheet, the saying to the left
of the soldier is “We’ll take it from here”.
After all decals were applied and left to dry, A few coats of Testors
Acryl dull coat was sprayed to seal everything up.
After the dull coat dried, all the weapons pylons were added to the
model.
|
| Click
on image below to see larger image |

|
|
For
a weapons load, nine GBU-12 Paveway IIs from the Hasegawa Smart Weapons set and
a couple of AIM-120 AMRAAMS raided from an Italeri kit were painted, decaled,
and hung from the weapons pylons.
The LANTIRN pods came from the Hasegawa U.S. Smart Weapons set instead of
the kit supplied pods. The
FLIR pod has a rotating lens and the forward section rotates as well.
The wheel wells were masked off and painted Model Master Semi-gloss white
as were the parts for the landing gear.
While these parts dried, I added canopy locking mechanisms and other
photo-etched tid bits to the canopy and set it off to the side to install last. In
order to insure the model sat properly, I used 5 minute epoxy so I could
|
|
| adjust
the landing gear as needed.
The navigation lights were painted as was the large vent behind the
cockpit and the dorsal UHF antenna.
The afterburners were assembled, painted and installed as was the
arrestor hook, AOA probes and pitot tubes.
With the canopy actuator, brace and canopy itself in place, the model was
complete.
Thanks
to Two Bobs Aviation Graphics, It is
now possible to add aircraft that represent a significant time in American
history.
As the decal above the pitot tube states:
Never
Forget!
|
| Click
on image below to see larger image |
 |
|
Albert
|
|